All in One View
Content from Introduction to MarcEdit
Last updated on 2026-07-03 | Edit this page
Overview
Questions
- What is MarcEdit?
- What can MarcEdit do?
Objectives
- Understand what the MarcEdit software does
- Understand how the MarcEdit software can be used to work with library bibliographic data and MARC files
What is MarcEdit?
MarcEdit is a suite of tools created and maintained by Terry Reese. The tools together form the MarcEdit software. These tools provide numerous functions. Functions can be used to create, edit, and manipulate library metadata. These tools can be used on records in a variety of MARC formats and standards as seen in this description of features. In this way, the MarcEdit software is MARC agnostic and can work with UNIMARC or MARC 21. MarcEdit can be used to:
- make small, single, edits to individual MARC records
- make edits across many MARC records at a single time
- automate common edits/processes
- validate your data against defined MARC rules
- convert data between different formats
- enhance your data to improve the quality, usefulness, or value by adding, refining, or enriching the data
- pull data from external sources
Although the ability to create, view and edit MARC records is built into many pieces of library and bibliographic management software, MarcEdit is particularly flexible and powerful for manipulating MARC data in bulk. With MarcEdit’s wide-ranging functionality and integration into other library software and services, it is a very powerful toolkit for anyone working with bibliographic data.
MarcEdit’s Primary Features
Profiling MARC Data
Before working with any data file, it is advantageous to understand that data. MarcEdit can help you answer common questions you might have of your data, such as: How many records are in the file? Does the file contain MARC data that describes only books, and are those books print and/or electronic? Do the records follow national metadata standards and best practices needed for your local systems?
Getting a profile of the MARC data in your file can help you make a plan on what changes need to be made to the file. Further, it can help you automate some of the changes if this type of file is one that you work with often.
Manipulating MARC Data
MarcEdit is like the Swiss army knife for MARC data. You can perform single (one record) or global (all records) edits such as adding or deleting MARC fields, subfields and indicator values. Other edit functions include building fields using MARC data from other fields, or changing the case of data in a field. You can also run functions that update your MARC data to the content standard Resource Description and Access (RDA) or assign OCLC’s FAST subject headings to records in the file.
Tasks and Automation
If you have a list of changes to make, MarcEdit allows you to package these together to be run one after another in Tasks. These packages of changes can then be saved for future use. This is one of the ways to automate your work, making manipulating your MARC data easier and quicker.
Integrations
MarcEdit can integrate with OCLC’s WorldCat and Ex Libris’ Alma library system platform. Thanks to these integrations, you can retrieve records from external services, manipulate the records, and then push the changes back to the system integration of your choice.
Using MarcEdit you can harvest OAI or Open Archives Initiative for Harvesting Metadata Protocol Dublin Core or MARC 21 records. Though not necessarily an integration, harvested records can also be manipulated.
Getting help
As seen in the Summary and Setup, if you encounter problems installing MarcEdit or using a MarcEdit feature, there are a number of helpful sources you can reference. The MarcEdit mailing list is an excellent mailing list. You can post questions and receive answers fairly quickly and often from the creator of MarcEdit, Terry Reese.
- MarcEdit is a tool for working with bibliographic metadata, specifically in the MARC 21 format
- MarcEdit can be used to open, review and edit MARC 21 files
- MarcEdit provides advanced features and integrations to support the manipulation of MARC 21 files
Content from Working with MARC files
Last updated on 2026-07-07 | Edit this page
Overview
Questions
- What is a MARC binary file?
- What does it mean to break and make a MARC file and how do I open a file of MARC records in MARCedit?
- Why is encoding important?
- How does the MarcEditor display MARC records?
Objectives
- Understand the difference between mrc and mrk MARC file formats
- Use the MarcBreaker to break and open a file of MARC records in the MarcEditor
- Explain character encoding and its importance
- Understand how MARC records and fields are formatted in the MarcEditor
Understanding MARC 21 in MarcEdit
MARC file types
MarcEdit recognizes the following MARC file types:
| File type | File extension | Usage |
| Binary MARC file | mrc | File format typically used in an ILS or LSP. Other file extensions provided by vendors (ex. marc, dat, bin) are equivalent. Binary is a format consisting of a series of sequential bytes, each of which is eight bits in length. |
| Mnemonic MARC Text File | mrk | File format used by MarcEdit that is a human readable version of the binary file. |
| OCLC DAT binary file | dat | File format used by OCLC, especially on export to a local computer. The export .dat file is a binary MARC21 UTF-8 file. |
| MARC UTF-8 Text File | mrk8 | Legacy file format for MARC mnemonic files saved with UTF-8 encoding. |
| MARCXML file | xml | A MARC file expressed in the eXtensible Markup Language format or a text-based format for representing structured information. |
To work with a MARC file in the MARCEditor your file needs to be in MARC mnemonic format (.mrk). If you only have a binary file (.mrc), then that file needs to be converted to the mnemonic format.
MARC Tools
To work with MARC data files or convert between metadata formats for library bibliographic data recognized by MarcEdit, click on the MARC Tools icon that has the crossed hammer and spanner in the upper left hand corner of the main menu. The key features are:
- MarcBreaker: This “breaks” the MARC binary file into a readable (mnemonic) format that can be edited in the MarcEditor.
- MarcMaker: This takes the readable (mnemonic) format MARC data file and creates the MARC binary file.
- MARC Tools also provides the option to convert between many other popular metadata formats used in libraries, such as: MARC 21 and MARCXML, MARC 21 and JSON, XML and JSON, MARC 21 and Dublin Core, and MARC 21 and MODS.
The conversions from one encoding standard to another, as in MARC21 to MARC21XML, rely on extensible stylesheets. MarcEdit comes with several default stylesheets which come from those maintained by the Library of Congress. If you are familiar with stylesheets, you can also create your own.
Character Encoding
Character encoding is a standardized system of numerical codes used to represent text characters —including letters, numbers, punctuation, and diacritics— within a MARC record. To ensure the integrity of your data you need to select the correct character encoding for your dataset. MarcEdit does not automatically detect character encoding, however, UTF-8 is set as the default encoding scheme. You can update the encoding scheme when using the MarcBreaker, or you can update the default in Preferences → MarcEditor → Default Encoding. For more information on character encoding and translating from one encoding to another, see The MarcEdit Field Guide.
Break a MARC Binary File
To transform our binary MARC file (.mrc) into MARC mnemonic human readable format (.mrk), you use the MarcBreaker.
Break a MARC (.mrc) file to use in the MarcEditor
- Launch MarcEdit and from the main window click on the MARC Tools Icon.
- In the MARC Tools window, Select Operation → MARCBreaker.
- In the field, Select Data to Process, click the file folder image to the right of the Open box to browse for the sample MARC data file (marc_sample_data.mrc). Double click the found file to select it.
- Next, you will need save your file in the MARC mnemonic format (.mrk) by clicking the file folder to the right of the Save As box. Select the location and name you would like to give your new file.
- Under Character encoding select UTF8 as default character encoding.
- Click execute.
- Once you click execute the newly created .mrk file will be available to open in the MarcEditor. Under Results at the bottom of the window you will see a count of the records in your file (536). Click Edit Records to open the .mrk file in the MarcEditor.
Note: When you break a .mrc file and create a new .mrk file for editing in the MarcEditor, you are making a copy of your data in a new file format. As a result, any edits you make to the .mrk file in the MarcEditor will not automatically be reflected in the original .mrc file. We will cover saving and compiling (using the MarcMaker) to create an updated .mrc file in lesson 6.
MARC Record layout in the MarcEditor
You should now see the MARC records from the file displaying in the MarcEditor:
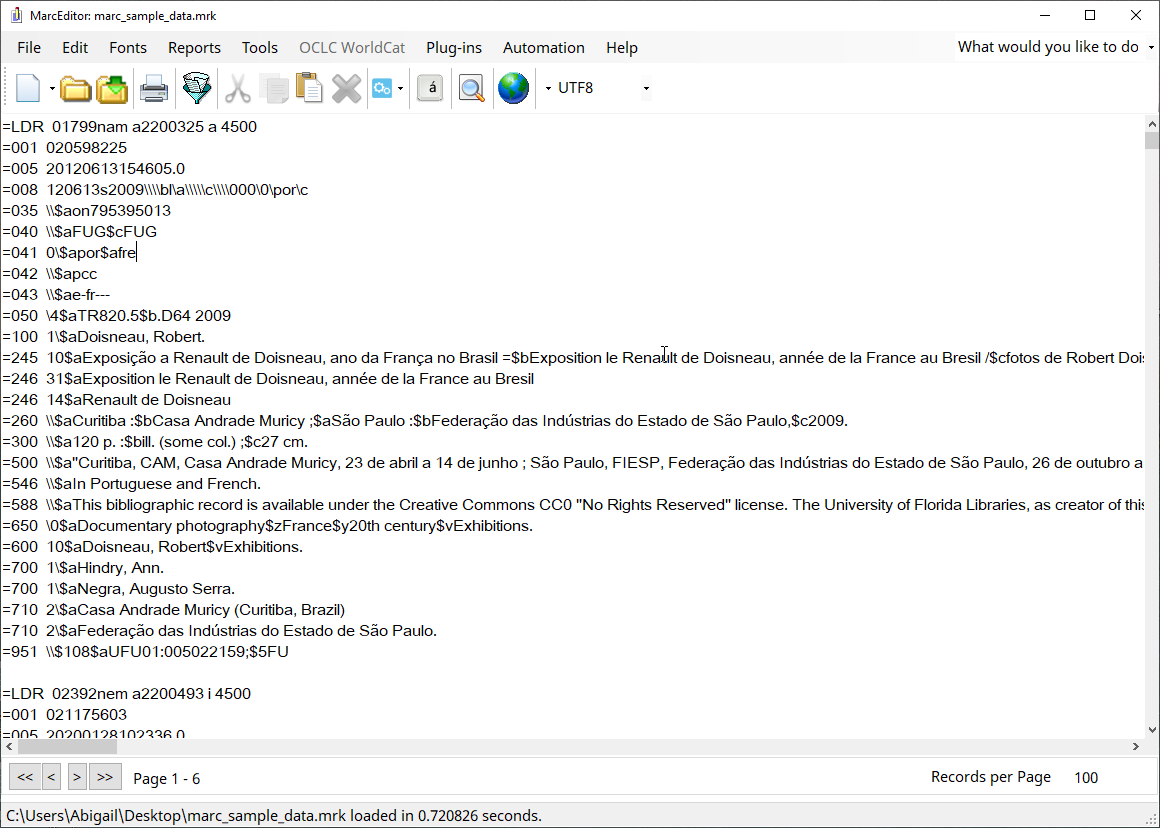
The MarcEditor displays the records in what is called the ‘Mnemonic MARC Text File’ format (file extension *.mrk). Each line in the file represents a field in a MARC record:
=245 14$aThe Lord of the Rings /$c J.R.R. Tolkien.This example breaks down as follows:
=
|
Each line/field starts with the ‘=’ sign. |
245
|
The ‘=’ is followed immediately by the three character MARC field code. |
[two spaces]
|
The MARC field is always followed by two spaces. |
14
|
The field indicators follow the spaces if the field has indicators. When
an indicator is not coded a \ is used. For the control or
fixed fields where no indicators are used, the field content starts
directly after the spaces.
|
$aThe Lord of the Rings /$c J.R.R. Tolkien.
|
The field content contains the subfields (indicated using the
$ symbol) and the text. Because the subfields use the
$ symbol, any real occurrences of the dollar symbol
(e.g. for currency) is shown as [dollar] instead. Unlike in
some cataloguing applications, there are no spaces between subfield
codes and the subfield text.
|
Records in the MarcEditor display are separated by a blank line.
MARC syntax in the MarcEditor
Understanding the layout of MARC data in the MarcEditor is key to using the program’s tools successfully. For instance, in some tools it is important to specify a field’s indicators directly before the first subfield. Throughout this workshop we will highlight how different tools rely on this syntax to apply edits.
The MarcEditor divides a file of MARC records into ‘pages’ of 100 records. You can scroll up and down the page of MARC records using the scroll bar as usual, but to see the next 100 records you need to use the Next/Previous page controls which are at the bottom left of the screen. The MarcEditor can handle very large files of MARC records, because it never tries to load all the records at the same time.
Setting MarcEditor Preferences
You can adjust the number of records displayed per ‘page’ through the MarcEditor preferences which can be accessed through the Edit → Preferences menu option from the MarcEditor, or through the ‘Settings’ icon on the opening screen of MarcEdit.
Within the MarcEditor Preferences, you can adjust the font and font
size used in the MarcEditor. You can also set your character encoding
defaults. If you navigate to File Associations within the Preferences
window, you can select Associate (*.mrc) files with the
MarcBreaker and Associate (*.mrk) files with the
MarcEditor. Setting these file associations will make it easy to break
.mrc files and edit .mrk files.
If you change your preferences for the MarcEditor, the tool used to work with MARC data, you can always go back to the default settings.
Reset settings for the MarcEditor in Preferences
- Click Edit → Preferences
- Select “MarcEditor” in the Preferences window in the left-hand pane
- In the right-hand pane, under Set MarcEditor Font Properties, select Set Defaults
- Click Ok
Behavior when you reset your preferences and other popup windows
Depending on the change you make, when you click Ok to reset preferences, the popup window for Preferences and/or even MarcEdit main menu may close. If the MarcEdit main menu closes, sometimes it will reopen. If it does not, then click on MarcEdit again on your desktop to reopen the application.
It should be noted that not all MarcEdit popup windows will close automatically such as Find, Replace, or the MarcValidator. However, the Select Records for Edit temporary editor will close if you click Save. These idiosyncrasies for each will be covered in their upcoming episodes.
- MarcEdit can work with a variety of file formats
- The MARC Tools Icon allows you to convert data from one file format to another
- The MarcEditor works with an easy-to-read MarcEdit-specific mnemonic format of MARC records (.mrk). If starting with a MARC binary file (.mrc), you must use the MarcBreaker to convert the binary file to a mnemonic file.
- Understanding the layout (syntax) of MARC records in the MarcEditor is key to working with the records.
Content from Layout of the MarcEditor
Last updated on 2026-06-02 | Edit this page
Overview
Questions
- What is the MarcEditor?
- How are MARC files organized in the MarcEditor
Objectives
- Explain what the MarcEditor does
- Explain how the MarcEditor features can help work with MARC files
The MarcEditor
The MarcEditor is a discrete utility within MarcEdit that enables you to work with your MARC data in an easily human and machine-readable format.
MarcEditor Top Level Menu
The MarcEditor has a robust set of features available via the top level menu. Features can be accessed through the menu or through shortcut keys. The shortcut key for a feature appears next to it in the menu. The next episodes will look more in-depth at how to use these features.

MarcEditor Top Level Menu Features
Each top level menu heading contains many options. Below are some highlights of those features that are frequently used when working with a set of MARC data.
File
- Save, Save As, Open, Recent: This is where you will find those important functions of saving, saving as, opening up a recent file, or opening a new file.
- Select Records for Edit: This is where you can select a subset of your data to work with.
- Compile File: This is the same function as MarcMaker, meaning that the readable MARC data file (.mrk) being edited in the MarcEditor will be converted to a MARC binary file (.mrc).
Edit
- Find and Replace: You can find or find and replace just on the current page or in the entire file.
- Edit Shortcuts: This is where you can change the case, find records that have a missing MARC field or duplicate MARC field, or find fields with a missing word.
- Jump To: You can use this to jump to a record in the file.
- Insert/Edit 006 or 008: This will open a form to easily insert or edit these fixed fields.
- Delete Record: You can delete one or more records in a range or based on invalid encoding characters.
Fonts
- If you need to change the font and size for the current MARC data you are working on in the MarcEditor, this is the place to do that.
Reports
- Create a custom report
- Get a count of all the MARC Fields in the MARC Data
- Get a count of the records based on type (book, serials, video recordings, etc.)
- MARCValidator
Tools
- Add/Delete Marc Fields
- Edit subfields
- Edit Indicators
- Build a new MARC field
- RDA Helper
- Sort By
OCLC WorldCat: Requires OCLC Integration Setup
- Search WorldCat
- Add/Delete/Update OCLC Bibliographic Data
- Create/Update Bibliographic Data
- Update Holdings
- MarcEditor is a tool to work with MARC data in an easily readable format.
- The MarcEditor has a robust top level menu.
- The MarcEditor’s top level menu features highlighted here are only a select representation of those used most when working with MARC data.
Content from Profiling your MARC data
Last updated on 2026-07-09 | Edit this page
Overview
Questions
- How do I use different reports to get an overview of my MARC file?
- How do I locate errors in my records?
- How do I use the Edit Shortcuts tool to identify and fix common errors?
- How do I validate the structure and content of my MARC file?
Objectives
- Understand and run reports for your MARC data
- Understand and run validation for your MARC data
- Understand where to find tools in the MARCedit Edit toolbar and shortcuts
- Explain the difference between Find and Find All
Profiling your MARC data
The MarcEditor provides multiple reporting options and tools to help you profile your MARC data and understand the contents of your file. Reports are located under the Reports tab. Two additional reporting and profiling tools are ‘Edit shortcuts’ and ‘MARC Validation’, which are described below.
Overview of reports under the Reports tab
The Material Type Report can be used to identify the
types of resources described in your MARC file. This report is helpful
when you are uncertain of what resources are represented in your file,
or to locate potential errors.
Run Material Type Report
To run the Material Type Report
- Click Reports
- Select Material Type Report
- Click Generate Report
If we expect our MARC file to contain only book records, we can
easily locate and review records with other material types by using the
Find Records by Type Report.
Run Find Records by Type Report
To run the Find Records by Type Reports
- Click Reports
- Select Material Type Report
- Select the material type of the records you want to review from the drop-down list. For this exercise, select Continuing Resources. A window will open displaying the Leader of each record. Double click on a result to be brought to that record in the MarcEditor.
- Click Close to exit the results window
The Field Count Report can also be used to profile your
data. The Field Count Report lists each field found in your records, the
number of times each field occurs in the record set, and the total
number of records each field occurs in. While high level, the results
can tell you about the cataloguing standards used (260 vs. 264) and
identify potential errors (repeating non-repeatable fields), missing
fields, local fields, etc.
Run Field Count Report
To run the Field Count Reports
- Click Reports
- Select Field Count
Find and correct the error with the title or the MARC field 245 using the Field Count Report
- Describe the Field Count report results
- Identify the error for at least one of the records for the title
- Fix the error for at least one of the records for the title
- Field Count outlines each field found in our records, the number of times it occurs, and how many records it occurs in. Field count can also tell us the number of records in our file (536).
- The non-repeatable field 245 occurs more times than the number of records in the file. In other words, at least one record contains multiple 245 fields. Field 245 appears in one less record than other required fields.
Edit functions
Other useful tools for profiling your data can be found under the Edit tab.
Like many applications, the MarcEditor provides a
Find/Find All function. Find is particularly useful for
locating and reviewing all instances of a MARC field within your data,
or locating a particular text string within your data.
Find: Find will perform a keyword search for your search terms entered in the Find window search box. Each time you click “Find”, you will be brought to the next instance of your search terms on the current page of the MarcEditor. Remember that the default settings split the MARC records into 100 for each page. Find will only search those records on the page you are currently on.
Find All: Find all will search for your search terms entered in the Find window search box over all the pages, or all your MARC records. When you click “Find All” a new window will open listing each instance of your search terms. Double clicking a result will take you to the result in the MarcEditor.
We can use Find All to locate and review the 245 field.
Run Find Function
To use the Find function
- Click Edit
- Select Find (*Ctrl+f will also launch the
Findfunction) - In the “Find what:” dialogue box enter =245
- Click Find All
Note: When using Find to locate
instances of a specific field, make sure to include the preceding =
before the field number. If there is a title such as “The Journey of 245
people”, this will then show up in your search results if you search
245. If you search for =245, it will find anything with that string. If
for example there is a contents note with “… =856 …” then this will also
appear in the search results. Typically the equals before the MARC tag
will bring up that MARC tag. By extension, if you want to find a
specific MARC field that have specific indicators, you will need to
include 2 spaces after the MARC field as in =245 00.
The Find results list is organized by record number, displaying the matched field content on the left, and the record number the field belongs to on the right. We can see from our results that Record # 8 appears twice, signaling that this record contains two 245 fields. By double clicking on “Jump to record #: 8” we could go directly to the record in our file to edit it. However, next we will show you a set of tools that can be used to locate and fix common errors like duplicate fields.
The Find Records With Duplicate Tags function allows us
to easily locate records with a duplicated field.
The Find Records Missing Field function allows us to
easily locate records with a missing field. To run this function
Run Find Records Missing Field Function
- Click Edit
- Select Edit Shortcuts
- Select Field Edits
- Click Find Records Missing Field
- In the dialogue box enter 245 and click OK
The results list will show one record missing a 245 field. Click on Jump to Record # to be taken to the record in the MarcEditor.
Correct the missing 245 field
- What is the issue with this record? Is the 245 formatted correctly?
- The 245 field number is formatted incorrectly. The MarcEditor relies on a standard format to identify and take actions on fields. Fix the missing MARC field 245 for the title ‘McGregor Smith Scout Reservation Master Plan by Erik Schofield’ by changing the line with =2 4 \0\(a to =245 \0\)a Removing the rogue space in the field number will correct this record.
Validation and Log Reports
There are a number of validation and log reports available.
- Validate ISBNs: When you select this report, a popup window will appear. Enter the MARC field where the ISBNs are. The report will see if these are correct. For example, if an ISBN is followed by text such ebook without a space, then the report will highlight this. However, if there is a space between the ISBN and any text, this is considered valid as in this example, 9780190856939 (ebook). You will need to close the popup windows.
- Validate ISSNs: When you select this report, a popup window will appear. Enter the MARC field where the ISSNs are. The behavior is similar to the ISBN report. The report will provide a result of errors or a message that no invalid ISSNs were found.
- Validate Headings: Unlike in Connexion or OCLC’s WorldShare, validating headings does not create hyperlinks. This report will compare headings to several online services. These online services are listed in the Service Status when you click on Validate Headings and select Service Status. Results will appear in a popup window.
- Manage log files: There is no version control such as Git in MarcEdit. However, if you click on Manage Log Files -> View Current Log, you will see the entire list of actions that you have done on your file.
MarcValidator Report
The MarcValidator report has a couple of options of which 2 are highlighted here. Note that if you are working with a large file, it will take longer to prep the file. Once it is prepped, there is a message that says “MarcEditor file has been prepped and is awaiting validation”. You can view results grouped by errors or remove invalid records automatically from your file.
- Check MARC Usings Rules File: The Rules file, called marcrules.txt, includes all the valid MARC fields, their valid indicators, and whether that field can be repeated. The Rules file can be modified. Once you open the MarcValidator, in the popup window, you will see the option to “Edit the Rules File”. You will need to respect spaces and entry conventions by following what is already present in that text file.
- Validate Record Structure: This report checks if the MARC syntax is valid and includes a check for HTML, tabs, and smart characters.
- MarcEditor provides different reports to profile your MARC records.
- MarcEditor provides a way to validate both the content and the structure of your MARC records.
- MarcEditor provides both shortcuts and a robust find or find all to search for patterns in your MARC records or certain patterns in your MARC records like duplicate or missing MARC fields.
Content from Manipulating MARC data basics
Last updated on 2026-07-09 | Edit this page
Overview
Questions
- How can MARC data be manipulated?
- How can fields, subfields, and/or indicators be added, changed, or removed?
- How can fixed fields be manipulated?
- What is the difference between save and compile?
Objectives
- Understand and identify use cases for the MarcEditor’s find, find all, and replace tools
- Understand how to add, update, and remove fields, subfields, indicators, and fixed fields using the MarcEditor’s tools suite
- Explain the difference between saving and compiling a MARC data file in the MarcEditor
- Save and compile a MARC data file in the MarcEditor
Manipulating MARC data
We have seen how we can manually and individually edit records in the MarcEditor, however, MarcEdit provides a number of more powerful ways to manipulate our MARC data. Fields, subfields, and indicators can be added, removed, or changed. Fixed fields can be corrected. Fields and subfields specific to RDA can be added while AACR2 conventions are removed. It is possible to work with a subset of MARC data and then incorporate those changes into the original whole MARC data set. The variations sometimes seem endless and give more weight to the nickname of MarcEdit, the Swiss army knife of MARC data.
Find, Find All, and Replace
As we saw in lesson 5, MarcEdit’s Find/Find All functionality supports reviewing your data. We can pair this functionality with Replace to start manipulating our data in bulk.
Replace: Replace works alongside Find/Find all. You have the option to Replace just those matching strings on the page or Replace all where the replace occurs on all pages in all records.
Find Text/Replace Text and Find All Results Popup Windows
The popup window for the Find Text/Replace Text function and the secondary popup window for your Find All search results will not close automatically. You will need to close these windows when you are done performing your find/replace actions.
Use Find and Find All to review the MARC field 856
- Go to Edit->Find (or CTRL+F).
- In the search box in the new window, type in
856. - Click Find.
- What results do you see?
- Close that window.
- Go to Edit->Find (or CTRL+F).
- In the search box in the new window, type in
=856. - Click Find All.
- Our results show a list of 282 instances of
=856. Note that the first results include an institution specific proxy=856 40\$3Full text:\$uhttps://proxy.ufl.edu?url=. We will need to remove this proxy string if we want to use these records in a different institutional catalog.
Remove a proxy from the MARC field 856
- Find those instances of
https://proxy.ufl.edu?url=in the record set. - Use Replace/Replace All to remove proxy string.
- Click Edit->Replace.
- In the search box for Find, type in
\$uhttps://proxy.ufl.edu?url=. - In the search box for Replace, type in
\$u. - Click Replace All.
Find and Replace
Remember to always verify the search results of the Find or Find All
and profile your data before making changes. Find or Find all will
search for the exact phrase or string that you put into the search box
either on that page (Find) or in every record (Find all). In the example
above, if your records contain MARC fields 856 with
different \$u data (for example:
=856 40\$3Online Access:\$uhttps://proxy.ucla.edu?url=) the
replace above will not remove the proxy from the 856
fields. You will need to do another replace.
Add/Delete a MARC field
To add or delete a MARC field, go to Tools in the upper menu in the MarcEditor and select Add/Delete Field. This will open a new Batch Editing Tools window. The Add/Delete Field functions are on the same menu level and you will need to select the action of either add or delete using the buttons on the right-hand side.
In the top middle section of the window, there are two data entry fields: Field and Field Data. Enter the MARC field number you want to add or delete in the Field dialog box. Then enter the indicators, subfields, and data in Field Data dialog box. Remember to include the dollar sign to indicate a subfield.
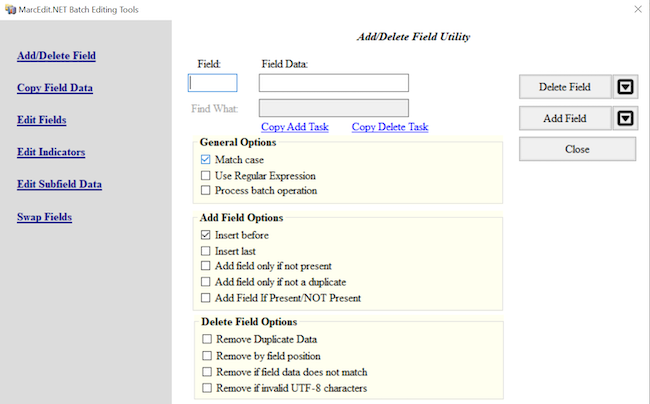
To add the field, click the Add Field button and to delete any matching fields, click the Delete Field button.
For both the Add Field and Delete Field functions there are a number of different options that can be applied to control the updates.
The options to Add a Field include: - Inserting the new field before
or after existing fields of the same type. For example, if you are
adding a new 500 note field, you can at it before or after
the existing 500 fields. - Limiting the addition of the new
field to records where the field is not present or where the field and
field contents are not duplicated. - Limiting the addition of the new
field based on the presence of other criteria found in other MARC
fields. For example, you can add a MARC field
655 \4$aElectronic books to only those records that are
eBooks based on the data in the LDR or
008.
The options to Delete a Field include: - Removing fields that
duplicate the existing content. - Removing MARC fields based on field
position. - Removing MARC fields that do not match what is entered in
the Field Data. For example, to ensure that only the field
655 \4$aElectronic books. is present in the MARC data, the
option Remove if field data does not match can be selected. - Removing
invalid UTF-8 MARC fields.
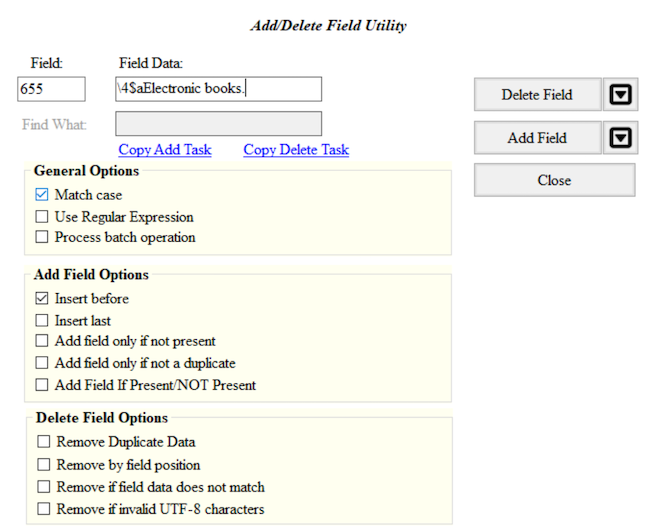
Add and then delete a MARC field
- Add a
655for electronic books with first indicators blank and second indicator4to the MARC data. - Delete that
655that you just added.
- Go to Tools in the upper menu in the MarcEditor.
- Select Add/Delete Field (F7).
- In the Field box enter
655, in the Field Data box enter\4$aElectronic books. - Click Add Field. You can also preview this change by clicking on the arrow on the right of Add Field and selecting Preview in the 7.5 version of MarcEdit
- Check your MARC data. Was this MARC field added?
- To delete this field, go back to Tools and select Add/Delete Field (F7).
- In the Field box enter
655. - In the Field Data box enter
\4$aElectronic books. - Click on the Delete Field button. You can also preview this change by clicking on the arrow on the right side and selecting Preview in the 7.5 version of MarcEdit.
Metacharacter syntax in the MarcEditor
Within the batch editing tools, MarcEdit uses the X metacharacter to
represent a numeric range for selecting and editing fields. For example,
if you enter 24X, that edit will act on fields 240-249; if
you enter 5XX, that edit will act on fields 500-599.
Delete a range of MARC fields that begin with a number
- Verify your data contains multiple
9XXfields. - Delete all
9XXfields.
- Verify your file has multiple
9XXfields by using the Field Count report (Reports → Field Count), or by using Find (Edit → Find=9→ Find All). - Go to Tools in the upper menu in the MarcEditor.
- Select Add/Delete Field (F7).
- In the Field box add
9XX. - Click on the Delete Field button. You can also preview this change by clicking on the arrow on the right side and selecting Preview in the 7.5 version of MarcEdit.
Add, Delete, or Change information for a subfield in a MARC field
To edit subfield data within a given field, go to Tools and select Edit Subfield Data. A new Batch Editing Tools window will open (notice that this is the same window that opened for Add/Delete a field, you can also navigate between the MarcEdit Batch Editing Tools using the labels on the left-hand side of the window). From here you can add a new subfield, delete a subfield, or replace text in a subfield. Set your desired subfield edit conditions by selecting the appropriate option(s) from the Search Options list.
To add a subfield, enter the MARC field and then the subfield. The text you would like to add in that subfield is entered in Replace With box. Select New subfield only from the Search Options below and then click Replace Text. Even though you are adding a subfield, you still click Replace Text. For adding a subfield, the information that goes in that field does not go in the box called Field Data, see the example below.
To delete a subfield, enter the MARC field and then the subfield. Select Delete Subfield from the Search Options and then click Remove Text.
To replace text in a subfield, enter the MARC field, the subfield, the text (or information) that needs to be changed in the Field Data dialog box. Enter your updated text in the Replace with box. Click on Replace Text.
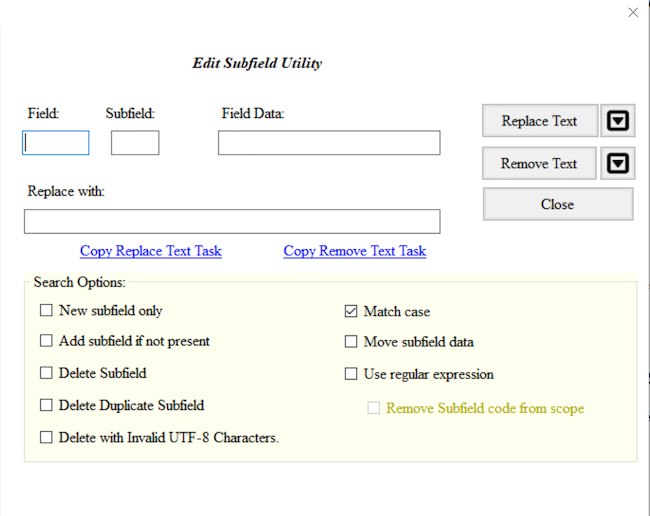
Ability to Preview and Special Undo
As of version 7.5, you can preview all of these changes before making them. If you complete a batch edit that produces unexpected or undesirable results, you can perform a Special Undo by selecting Edit → Special Undo. Special Undo will return your file to the state it was before your last batch edit, meaning if you have performed any manual edits after your batch edit, Special Undo will also undo your manual edits. You can only use special undo once, meaning you cannot undo two batch edits. Undo and Special Undo are different. Undo undoes manual edits whereas Special Undo undoes a single batch edit and any manual edits completed following the batch edit.
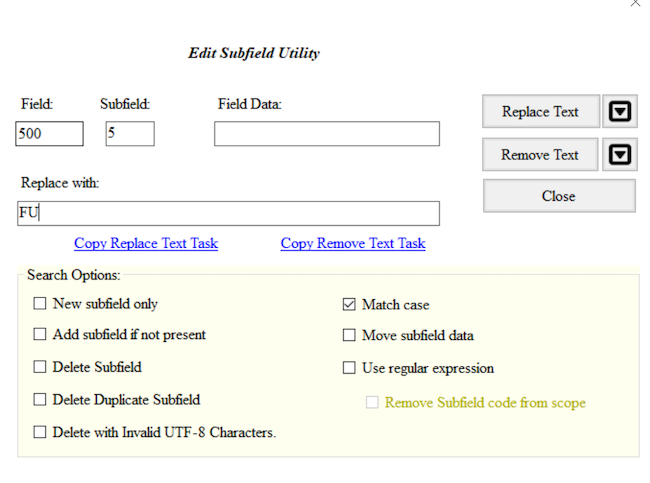
Add and then Delete a MARC subfield
- Change the
$5for the MARC field500from FU to your own Library of Congress Organization Code. If you are unsure of your Library of Congress Organization Code, update the code to XYZ. - Delete that
$5that you just changed.
- Go to Tools in the upper menu in the MarcEditor.
- Select Edit Subfield Data (F9).
- Add
500in the Field box,5in the Subfield box,FUin the Field Data box, and your LC Organization Code in the Replace With box. - Click on the Replace Text button.
- Check your MARC data. Was
FUchanged to your LC Organization Code? - To delete this subfield, go back to Tools and select Edit Subfield Data (F9).
- Enter
500in the Field box,5in the Subfield box. - Click on the Remove Text button.
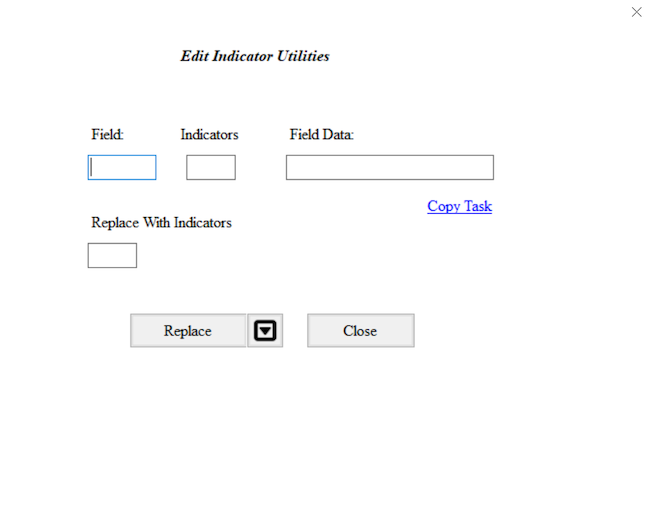
Change one or both indicators in a MARC field
Sometimes it is necessary to change one or both indicators of a MARC field. To edit field indicators, go to Tools and select Edit Indicators. This will open a new Batch Editing Tools window. Enter the MARC field and the indicators that you would like to change. Enter the new indicators you want in the Replace With Indicators box. Here you will want to be careful of the combinations of indicators. If you leave the Indicators box blank and add indicators in the Replace With Indicators box, all the indicators for that MARC field will be changed to the indicators entered in the Replace With Indicators box.
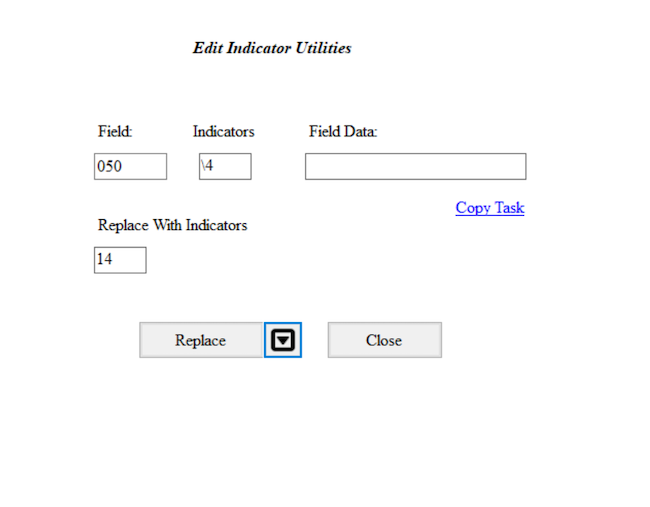
Change an indicator for a MARC field in your MARC data
- Change the first indicator of the MARC field
050to1for those MARC fields050that have a first indicator blank and a second indicator4.
- Go to Tools in the upper menu in the MarcEditor
- Select Edit Indicators (F8)
- Add
050in the Field box,\4in the Indicators box, and14in the Replace With Indicators box. Leave the Field data box blank - Click on the Replace button.
- Check your MARC data. Were the
050 \4updated to be050 14?
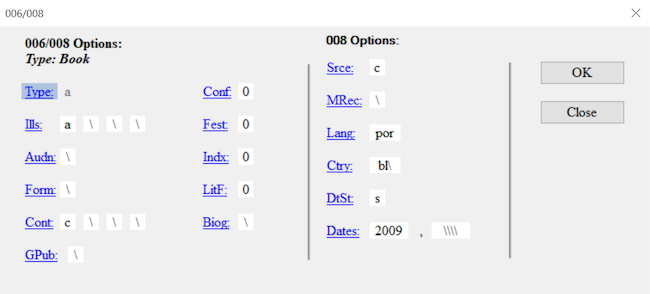
Working with MARC fixed fields
Working with fixed fields can be difficult. In the MarcEditor, you
can edit one fixed field at a time using the easy editing window. If you
put your cursor on that fixed field, such as an 008 or
006, then go to Edit and select Field 006 or Field 008.
This will open up a window where you can edit the fixed field for that
specific MARC record. To add one fixed field, put your cursor on the
line where you want that fixed field inserted, go to Edit, and then
select Field 006 or 008. In the window, edit the fields for that
specific record.
Batch Editing Fixed Fields in Multiple MARC Records
Sometimes it is necessary to change a fixed field for all records in your MARC data. You can use the Edit Field function. For this, you will need to know the position of the fixed field. For this, you can consult the OCLC Bibliographic Standards and Formats or the Library of Congress Bibliographic Marc Standard. This is also possible using the Replace function and regular expressions which will be covered in Lesson 09.
If you need to add a fixed field, you can use the Tools and select Add/Delete. You will need to have the 006 already formed. For example, you can add one 006 using the method explained above, copy that, and then use the Tools, Add field, to then add the 006. Remember that fixed fields do not have indicators.
Saving and Compiling
The MARC data that you manipulate in the MarcEditor is in a human and
computer-readable mnemonic .mrk file format that was broken
from the original binary .mrc file. You will notice that
the file name of the file you are working on, displayed at the top of
the MarcEditor, has the file extension .mrk. If you look at
the file in your file directory, the file icon color is blue whereas the
binary .mrc MARC file icon is purple.
Saving
When you save in the MarcEditor, you are saving your latest changes
as a .mrk file. Using File → Save will save edits into your
current .mrk file, overwriting the original. To keep a copy
of your original .mrk data, select File → Save As and
choose a new file name for your edited records.
Compiling
To save your edited records back into a MARC binary .mrc
file (the file format typically required to load MARC records in
external systems such as your ILS or LSP) use the compile feature.
Select File → Compile File into MARC. Choose a new file name for your
edited .mrc file. Using the same file name as your original
.mrc file will overwrite the unedited file.
Records can also be compiled outside of the MarcEditor using the
MarcMaker tool. To use the MarcMaker, from the Main Menu select MARC
Tools. In the MARC Tools window, under Select Operation choose
MarcMaker. Under Select Data to Process, in the Open box, select the
.mrk file you would like to compile. In the Save As box,
specify the location and file name for your new .mrc file.
Set the character encoding options as required, and then click Execute.
Once compiled, you will see a message under Results specifying the
number of records in the new .mrc file.
- MarcEdit can be used to add, delete, or edit any part of the MARC data including the Leader, fixed fields, fields, indicators, subfields and the content in those fields.
- MarcEdit comes with an array of tools and comprehensive options to manipulate data and validate MARC.
- MarcEdit provides methods to undo, save and compile your work done in the MarcEditor.
Content from Manipulating MARC data advanced
Last updated on 2026-06-02 | Edit this page
Overview
Questions
- How can the Edit Shortcuts features be used to manipulate data?
- How can Build New Field be used to combine elements from existing MARC fields into a new field?
- How can the RDA Helper be used?
- How can Select Records for Edit be used to manipulate a subset of your MARC file?
Objectives
- Change the case of field data
- Create a new field by combining existing field data and static values
- Explain the functions of the RDA Helper
- Select records to edit based on the presence of a field
- Add Cutters to call numbers for a subset of records
- Verify editing results using Find or Find All
Edit Shortcuts
The Edit Shortcuts menu can be found by going to Edit in the menu in the MarcEditor and then selecting Edit Shortcuts. Edit Shortcuts have several powerful options.
- Change Case: You can select to change the case of a MARC field or a MARC field and subfield to lower, upper, initial, or title case. You can also capitalize the initial character.
- Field Edits: You can clean smart characters or ISBD punctuation, correct mnemonic errors, generate paired ISBN-13 values, find fields missing a word, find records missing a field, find records with duplicate tags, insert a Generic LDR if it is missing, limit the number of fields, replace HTML entities, or swap a title.
- Math Functions: Convert to decimal degrees.
Let us use Edit Shortcuts to make the 099$a upper case
- Go to Edit → Edit Shortcuts -> Change Case -> Upper Case
- In the new window, in the field box, type in
099$a - Click OK
Use Find or Find All to Verify Results
You can use Find or Find All to verify that the change did what you expected on your records in the file. If a result did not work as expected, you can select “Special Undo”. This is why it is important to profile your data before doing batch edits.
Building a MARC field
Sometimes it is necessary to create a new MARC field based on the content of existing MARC fields. This is possible using the function called, Build New Field.
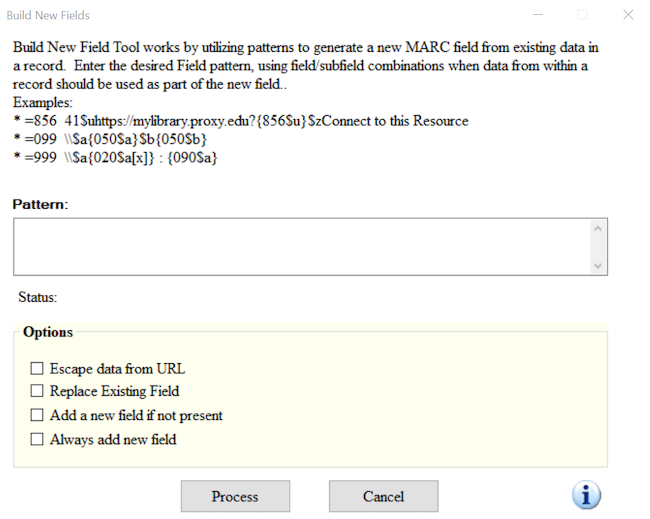
Let us build a new 035 9\$a using
the data from the 001 and static data
- Go to Tools → Build New Field
- In the new window, in the field box, type in
=035 9\$a(LCMarcEdit){001} - Select the box to “Always add this field”
- Click Process
Use the Build New Field to add a proxy to the
856$u
- For eResources, it is sometimes necessary to add your institution’s
proxy information to the url in the
856$u. Addhttps://exampleproxy.edu/login?url=prefix to the url in the856$u.
- Go to Tools → Build New Field
- In the new window, in the field box, type in
=856 40\$uhttps://exampleproxy.edu/login?url={856$u} - Select the box to “Replace Existing Field”
- Click Process
Beware the Build New Field Function
In the example above, if your 856 contains other subfields such as
$3, then these will not be retained because you are only building a new
856 that replaces the current one. To retain $3 data, you would need to
include this parameter in your function. This would look like
=856 40{856$3}\$uhttps://exampleproxy.edu/login?url={856$u}
Also note, the build new field works on the first iteration of the field. When working in particular with the MARC field 856, if you need to build a new field using all of the MARC fields 856 in your record, you can use the syntax [x] as in {856$u[x]}. This will ensure all of the MARC fields in the records will undergo the build operation you specify.
Advanced Subfield Edit Functions
There are 3 advanced Edit Subfield features that are extremely useful. These are append, prepend, and change subfield. These are not regular expressions but special characters built into the MarcEditor Edit Subfield tool.
- Prepend data to a subfield: Special character ^b
- Change subfield character: Special character ^c
- Append data to a subfield: Special character ^e
Let us add the proxy to the 856$u using the prepend special character ^b
- Go to Tools → Edit Subfield Data
- In Field, Enter 856
- In Subfield, Enter u
- In Field Data, Enter ^b
- In Replace with, Enter “https://exampleproxy.edu/login?url=”
- Click Replace
RDA Helper
Records are not created equal in that we encounter MARC data that follows different descriptive cataloging standards. There are many records cataloged according to the AACR2 standard or even AACR or earlier. Sometimes it is necessary to make sure these records follow the current RDA descriptive cataloging standard. MarcEdit lets you do this through the function called RDA Helper.
To run the RDA Helper, go to Tools and select RDA Helper. In the
window that opens, you can pick and choose how you would like to
transform your records to align better with the RDA descriptive
standard. For example, you can add the RDA fields 336, 337, and 338 for
content, media, and carrier types. You can update the MARC field 040 to
include the $e rda and delete the GMD statement. You can
also evaluate the 260/264.

Run the RDA Helper on your MARC data
- Run the RDA Helper with these settings: Add 336, 337, 338; Modify the 040; Evaluate the 260/264; Always use the copyright symbol; Expand abbreviations; Remove the GMD.
- Go to Tools in the upper menu in the MarcEditor
- Select RDA Helper
- Check off the settings listed above
- Click the OK button.
- Check your MARC data. Do you see the changes?
Select Records to Edit
There are times when you need to work on a subset of your MARC data. The Select Records for Edit function allows you do this.
Before using the Select Records for Edit function, save your file (Ctrl + S) to capture recent edits.
Go to File and click on Select Records for Edit. In the window, you
will see Display Field in the lower right hand corner. This is where you
enter the MARC field you want to see displayed once you import your
file. You can enter a MARC field and subfield or just a MARC field. The
MARC field and/or subfield that you add in this box will provide the
criteria you need to select records you want to edit. Once you have
entered the Display Field, click on Import File. This will import the
MARC (.mrk) file that you are currently working on. You can
select another MARC (.mrk) file in the box Source MARC
file.
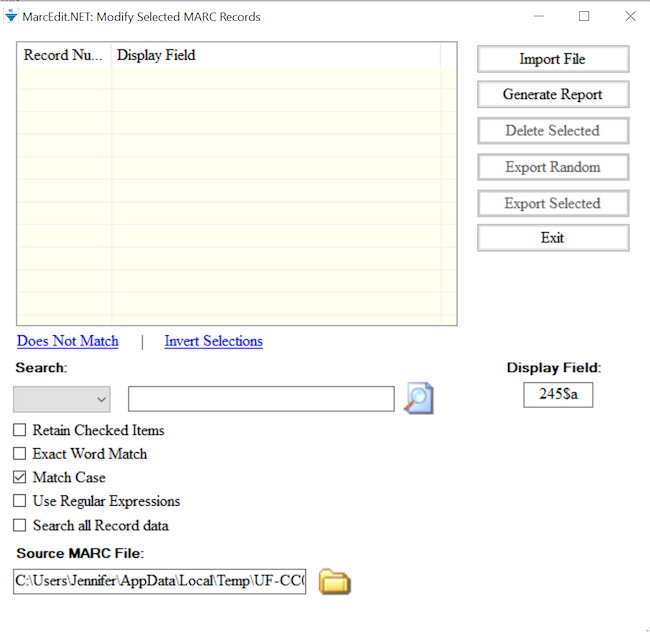
Records can be selected individually by clicking the checkbox. However, to select only the records you want to edit in bulk, enter your criteria in the Search box and click the magnifying glass icon. Records in your file where the contents of the selected Display Field match your search criteria will be selected. Click on Export Selected to export these records and edit them.
When saving the exported records you can choose to save the file as a new record subset (Save As), or merge the edits back into your complete record set (Save). When selecting (Save) to merge edits back into your complete record set, the temporary record set will close. Reopen your complete record set .mrk file to continue editing.
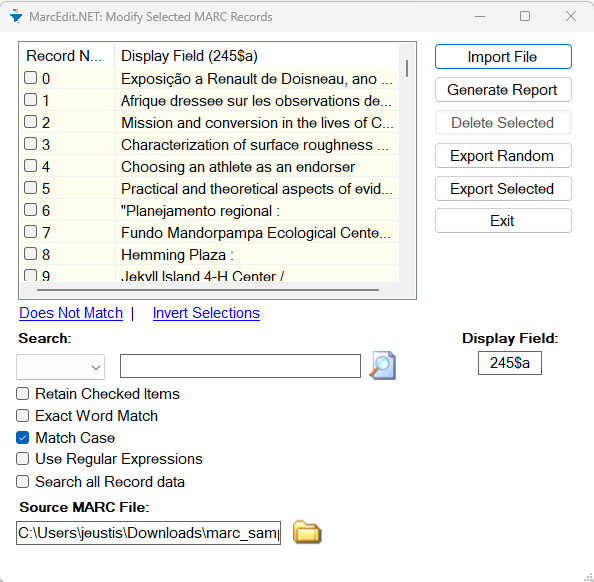
Let us add cutters to call numbers in the 099
- Go to File → Select Records to Edit
- In the new window, type in
099$bin the Field Display - Click on Import File
- In the search box, type in “Display field not found” to locate all
records missing
099$b - Click the magnifying glass icon. A pop up window will indicate the number of records selected that match your criteria. Click OK.
- Click on Export Selected. A pop up window indicate that your selected records have been extracted. Click OK.
- A new MarcEditor window will open. Note the temporary file name at the top of the editor window indicating this file is distinct from your main file. In the new MarcEditor, go to Tools → Call Number tools → Cuttering Tools → Generate Cutters.
- In the field box enter 099, select Cutter order (1xx,2xx), and click Process
- Check your results by using Find All
=099 - Select File → Save. A pop up window will indicate your extracted data with edits has been saved back into your main file. Click OK.
For more information on the Cuttering Tool, watch Terry Reese’s YouTube video Automatically Generating Cutter for Call Numbers
- Advanced reports and functions are available in MarcEdit to apply global and selective edits
- MarcEdit comes with an array of tools to manipulate data and validate MARC.
Content from Tasks and Automation
Last updated on 2026-07-07 | Edit this page
Overview
Questions
- What are tasks?
- How do you create new tasks and manage existing tasks?
- How do you run tasks?
Objectives
- Understand how to create, manage, edit, and run tasks in the Marc Editor
- Identify use cases for task creation
- Create and run a new task
Understanding Automation in MarcEdit
When working with MARC records regularly, you will likely encounter record sets where the data needs the same or very similar approach. A good example is electronic resource records where the resource URL in the 856 field will require the addition of an institution-specific proxy stem. Another example is adding RDA content, carrier, and media terms and codes to your records. Because MARC records typically need to meet cataloguing community standards and local best practices, it is necessary to manipulate MARC data to fit these standards and practices. In the previous lessons learned how to apply one change at a time. In this lesson, we will learn how to string together and automate these changes so they can be re-used in the future.
In the MarcEditor, tasks are the tool that enable such automation. A task is a series of changes to MARC data that occur in the sequence they are entered in the task. One can think of tasks as a mini script of sorts that string together different MarcEditor functions that manipulate MARC data in some way. All tasks are created, managed, and run in the MarcEditor. In this way, tasks are another way to manipulate your data and are an extension of the other tools offered in the MarcEditor.
What are Tasks?
A task is a series of MarcEdit functions to manipulate data. In the previous lessons, we ran one function at a time. Tasks string a set of functions together so you can run them as a group. Tasks run each function one after another. As such, it is important to think about how you order the functions in your task. For instance, if you want to add your institution’s proxy and the MARC data already has a proxy that you need to delete, your task has to account for that and remove the old proxy before adding a new one.
Tasks are managed through the Task Manager in the MarcEditor. To access the Task Manager, go to Tools and then Manage Tasks in the top level menu. This will open the Task Manager window.
In this window, you will see any tasks that you have created previously. You will see the name that you gave those tasks, the path to where those files are saved on your local computer, a shortcut, and a description. At the bottom of this window you will also have two options “Task Actions” and “Manage Existing Tasks”.
Task Actions include:
- New Task: This will create a new task.
- Clone: This will duplicate an existing task.
- Delete: This will remove a task.
- Edit: This will allow you to edit an existing task.
- Rename: This will let you assign a different name to an existing task.
Manage Existing Tasks include:
- Assign to Group: This will let you put tasks into different categories or groups.
- Assign keystrokes: This will let you assign shortcut keys to tasks.
- Backup all tasks: This will let you backup your tasks to your local computer.
- Delete Task Group: This is to remove an existing group.
- Export Task File: This will save a selected task to your local computer for reuse or sharing.
- Import Task File: This will bring in a task from your local computer.
- New Task Group: This will allow you to create a new group.
- Relink tasks: This will allow you to relink tasks.
- Remove From Group: This will let you remove a task from a group.
- Rename Group: This will allow you to rename a group.
The difference between these two actions lists might seem confusing at first. Task Actions allow you to work with a particular task in terms of creating and managing one specific task at a time. The Manage Existing Tasks menu allows you to create and manage groups, exporting and importing, and assigning keyboard shortcuts to tasks.
Tasks do not have to be categorized in groups or be linked to keyboard shortcuts. This is up to the users and their preference for how they organize their task workspace.
Create a New Task
To create a task in the MarcEditor, Go to Tools in the top level menu and then Manage Tasks. In the Task Actions menu, select “New Task” from the dropdown menu and then click Select. In the dialogue box, enter the name of your task and click OK. This opens the Edit Task List window where you will see the name you gave your task, a description, tasks, and actions.
Please note that though the Task List Name box allows you to change the name, these changes will not save. To change the name of a task, you need to go to Task Actions and select Rename task.
You can add or update a description in this task list window. The box in the middle will list the functions (or tasks) for this particular task. If there are none, this window will be empty.
Actions include:
- Add: Add a new function or task
- Copy: Clone a function or task already in the list
- Delete: Delete a function or task
- Edit: Change an existing function or task
You can add a new task by clicking on the plus button. You can add any type of function available in the MarcEditor Tools and Edit Shortcuts menu options. This includes the RDA Helper, build a new field, change the case of a MARC field, or generate cutters. You can even include a list of functions (tasks) from another Task.
Click on save at the left bottom corner of the Task List window to save your Task. From there you can close the Task Manager window. To run a task, go to Tools → Assigned Tasks → Current Tasks.
If you have created many Tasks, it does help to assign them to groups to more easily find what you need. If you do not use Groups, the Task Manager will list all of your Tasks in the order they were created and it might be difficult to find a specific task, especially on small screens such as laptops. Tasks can also be reordered in the Task Manager by selecting a task and then moving it in the list using the up and down arrows.
Create and run a new Task that runs the RDA helper and removes 9XX fields
- Go to Tools in the upper menu in the MarcEditor
- Select Manage Tasks
- In the Task Manager window, in Task Actions, select New Task
- Click Select.
- Name your Task
- In the Task List window, you can describe this task.
- Click on the plus button and add RDA Helper.
- Click on the plus button and add a new Add Delete Task Field
- In the new window to delete a field, add 9XX and click on Delete field.
- Save Task
- Close the Task Manager
- Go to Tools, then Assigned Tasks, and select your task that you just created
- Check your MARC data. Are the 9xx gone? Does every record now have the appropriate RDA fields?
Managing your Tasks
To edit an existing task, go to Tools → Manage Tasks. In the Task Manger select the task you want to edit, this will highlight the task. Under Task Actions choose Edit Task and click Select. This will open the Edit Task List window. Just like when creating a new task, you can add, delete, or edit functions in your task. Use the up and down arrows to the right to reorder your functions.
Add a proxy to the 856 40$u in
your Task
After you run your Task, your MARC records should have your institution’s proxy before the URL. Remember to check your data first to see if there are any proxy stems present. You will need to remove any existing proxies before running your Task. If the MARC data has different types of electronic URLs (resource, related resource, etc.) as noted in the MARC field 856 indicators, you will need to account for that in your Task.
- Go to Tools in the upper menu in the MarcEditor
- Select Manage Tasks
- Select the Task you just created. The selected Task will be highlighted.
- In Task Actions, select Edit Task and click Select.
- Select the plus button and select “Add a Replace All Task”
- Replace the
856 40$uwith856 40$u[your proxy]. Remember to add 2 spaces after the MARC field. - Save
- Close out of the Task Manager
- Run your Task again
- Check your MARC data. Do you see the changes?
Copying Functions to Tasks
It is possible to copy many functions run in the MarcEditor to a Task for easy reuse. To copy a function, look for the “Copy Task” button in the Batch Editing Tools and Replace Text windows. By clicking “Copy Task” after you have designed and run a function successfully, you can save that function. To add the function to a Task, go to Tools → Manage Tasks. In the Task Manger, under Task Actions choose New Task and click Select. Once in the Edit Task List window, right click and select “Paste Task Action”. You can also add the function to an existing Task by selecting Edit Task, instead of New Task.
- MarcEdit tasks are a way to automate a series of functions
- Tasks can consist of any type of function among the MarcEditor tools
Content from Integrations
Last updated on 2026-07-07 | Edit this page
Overview
Questions
- What are integrations?
- What work can integrations support?
Objectives
- Understand what integrations are and why they are useful
- Understand where to set up an integration
- Set up a Z39.50 service and search for a MARC record
MarcEdit and 3rd Party Integrations
MarcEdit can interface (or integrate) with other applications. Integrations with other cataloguing utilities, such as vendor ILS and LSP systems and OCLC WorldCat, support advanced actions, including downloading records, pushing new records or record updates, and setting holdings (OCLC WorldCat). Currently, MarcEdit can integrate with the ILS Alma, Koha, or a local ILS if you can connect to the host database. MarcEdit can be set up to integrate with OCLC’s APIs for metadata and connect to OCLC or the Library of Congress (UTF-8 or MARC8) Z39.50 services.
For the ILS integrations you will need one or some of the following:
- Host URL of the database
- Username and password
- OCLC Connexion username and password
- Token
- API Key
Integration with an ILS
At this time, MarcEdit supports integrations with the ILS Alma and Koha. The ILS integration will require you to request an API key from your systems person, your ILS vendor, or your hosting vendor. For additional support setting up the integration, you may leverage your vendor or user group community. For example, for Alma, you can reach out to the Alma listserv to get guidance or to the Alma Tech Blog on integrating MarcEdit with Alma. For Koha, this article from ByWater Solutions offers guidance on how to edit records in MarcEdit using the Koha MarcEdit integration.
Integration with OCLC’s API
For the OCLC API integration, you need to check if your institution is eligible and request an API key for this service. If your institution is eligible, you can request a key through OCLC’s developer network. You can also go to Preferences from the main menu in MarcEdit, click on OCLC API Integration and then click on the “Request an OCLC Key”. It is recommended to consult OCLC’s help page on setting up MarcEdit OCLC integration as well as Terry Reese’s information from his blog.
Integration with a Z39.50 Database
Many systems rely on the Z39.50 protocol to search and exchange data. It could be the case that your current ILS relies on it for Interlibrary loan or copy cataloging. zbrary provide a directory of available Z39.50 databases along with the required information.
The required information for setting up a new Z39.50 Database is outlined below:
| Field | Value |
|---|---|
| Name | Enter a name that helps you remember which Z39.50 service you are connecting to |
| Host | The link to the host’s Z39.50. |
| Database | Enter the name of the database |
| Port | Enter the port number |
| Syntax | Enter the flavor of MARC such as USMARC |
| Username | Enter a username |
For OCLC, this information looks like the following.
| Field | Value |
|---|---|
| Name | OCLC’s Library Catalog |
| Host | zcat.oclc.org |
| Database | OLUCWorldCat |
| Port | 210 |
| Syntax | MARC21 |
| Username & Password | Connexion Username of 3 numbers - 3 numbers - 3 numbers as in 100-034-090 and your Connexion Password |
You can add multiple Z39.50 connections. To do this, go to the main menu, click on Tools, then Utilities, then Z39.50/SRU Client. In the new window, click on Actions in the upper left hand corner and select “Add new Z39.50 Server”.
Add an integration with a Z39.50 Database
Add a connection to the Library of Congress’ Z39.50 using the information below. What is the main entry if you search for the record number 983545?
- Name: Library of Congress
- Host: lx2.loc.gov
- Database: LCDB
- Port: 210
- Syntax: MARC21
- Username/Password: Leave Blank
- Go to Tools in the main menu
- Click on Tools -> Utilities -> Z39.50/SRU Client
- In the new window, click on Actions -> Add new Z39.50 Client
- Use the information above to fill out the fields
- Click Save
- Make sure the Query Database has “Library of Congress”
- Make sure the Search box is set to “Record Number”
- In that Search box, put in 983545
- 1 result with the Main Entry of “Querelae & opprobira ventribuli, sive.”
- Integrations allow you to connect to external catalogue applications that can support search, exchange, and editing of MARC data
- Some integrations are free, while others require institutional subscriptions before they can be configured and used
Content from Regular Expressions
Last updated on 2026-07-07 | Edit this page
Overview
Questions
- What are regular expressions?
- Where and how can you use regular expressions in the MarcEditor?
- What types of edits can you accomplish with regular expressions?
Objectives
- Understand what regular expressions are and how they can support advanced editing in the MarcEditor
- Bring data and format consistency to fields with varying values by applying edits using a regular expression
- Select a subset of records to edit based on the values in multiple fields using a regular expression
Regular Expressions in MarcEdit
Regular expressions, often referred to as regex, are a tool you can use to match, capture and manipulate data across your MARC record file. Regular expressions are comprised of a sequence of literal characters and metacharacters which are formulated to match a particular pattern found in your data that you want to manipulate. A detailed introduction to working with regular expressions can be found in the Library Carpentry lesson Introduction to Working with Data (Regular Expressions). In this lesson we will focus on the application of regex in the MarcEditor.
MarcEdit uses the .NET regular expression syntax. Visit the .NET Regular Expression Language - Quick Reference for a breakdown of the syntax used for regex metacharacters in MarcEdit. You can also download the .NET Regex metacharacter reference sheet to support the creation of your own regular expressions in MarcEdit.
Many MarcEdit functions support the use of regular expressions for data selection and manipulation. They include: Find and Replace, Edit Field, Copy Field, Swap Field, Build New Field, Delete Field, Record Validation, and both the Extract and Delete Selected Records tool. The intent of this lesson is to demonstrate where and how you can leverage regular expressions to work with your MARC data.
Edit Field Data
With regular expressions you can easily locate variations in your
data and replace them with a single value. In our file the OCLC
identifier in the 035 field uses the prefixes on,
ocn, and ocm, but our library formats the OCLC
with the (OCoLC) prefix. Instead of running three Edit
Field Data functions to update these prefixes, we can use a regular
expression in the Edit Field Data tool to replace these prefixes with
the (OCoLC) prefix in a single edit.
Update 035 OCLC prefixes
- Select Tools → Edit Field Data.
- Enter the following values: Field:
035Find:on|ocn|ocmReplace:(OCoLC) - Check Use Regular Expressions box.
- Click drop down menu → Preview Results.
- Verify your results look as expected, close preview tab and then
click Process. In this regular expression we use the pipe
(
|) metacharacter to specify that we are looking for the stringonORocnORocm. We then replace the captured string with(OCoLC).
Knowing your dataset
Regular expressions are a powerful tool, but using them can sometimes
lead to unexpected and undesirable results if you do not know your
dataset. In the Edit Field Data exercise above, any 035 field containing
the string on, ocn, or ocm would
have had these values replaced with (OCoLC).
For example: =035 \\$a(SFUonline)638023 would have
become =035 \\$a(SFU(OCoLC)line)638023
Reviewing your dataset before employing regular expressions is a good best practice. The MarcEditor Preview Results feature also supports trial and error.
Find and Replace
The Find and Replace tool is another useful way to identify and
manipulate data in the MarcEditor with the support of regular
expressions. In our file the local call numbers in the 090
field are formatted without a space between the class and subclass (ex.
LD1780 and not LD 1780). To update the call
number to follow our local policy we need to isolate the components of
the call number so we can add a space between them. We can do this with
a regular expression by employing groups.
Add a space between 099 class and subclass
- Select Edit → Find.
- Enter
=099in the Find box and click Find All. Review the list of099fields, what observations can you make about the call numbers in this field? Review shows us that not all call numbers begin with letters. We do not want to add a space to these call numbers and need to account for this in our regular expression. - In the Find window, click Replace to bring up the Replace Text functions.
- In the Find box enter the regular expression
(=099 \\\\\$a[A-Z]+)(\d.*). This regular expression uses two sets of()to capture groups and then manipulate them.
- Broken down, the first group
(=099 \\\\\$a[A-Z]+)will match the literal string=099 \\$a(the additional backslashes are used to escape the regex metacharacters\and$so that they will be read as literals) followed by any single capital letter in the range A to Z ([A-Z]) one or more times (+). By specifying that the regular expression must locate a capital letter at the start of the call number, the regular expression will not edit the call numbers that begin with a digit. - The second group
(\d.*)will match any digit (\d) followed by any character (.) zero or more times (*).
- In the Replace box enter
$1 $2. This regular expression refers back to the groups we defined and captured in the Find box.$1refers to the group defined in the first set of brackets, and$2refers to the group defined in the second set of brackets. If we had defined additional groups they would be referred to chronologically as$3,$4etc. The regular expression$1 $2will output the contents of the two captured groups with a space between them. - Check the Use regular expressions box.
- Click drop down menu → Preview Results.
- Verify your results look as expected, close preview tab and then click Process.
Using a Regex Tester
While the MarcEditor provides a way to preview the results of your regular expression, you can also use a regex tester such as Regex101. A live regex tester allows you to copy in sample data and then build a regular expression to manipulate that test data. The tester is especially helpful because it provides an explanation of how the regular expression is working on your data, as well as built in quick references for common regex syntax and functions.
Select Records for Edit
The Select Records for Edit tool, introduced in lesson 6, allows you to isolate and then work with a subset of your records. Regular expressions can be a powerful tool to help you isolate the subset of records you want to work with.
In this example we want to add the electronic journals genre form
(655 \\4$aElectronic journals) to our electronic
continuing resource records.
Working with fixed fields, where character position and coded values impart specific meaning, can be difficult for the human eye. However, regular expressions make it easy to specify the position of a character in a text string in order to find, select or update that data.
Isolate continuing resource records
- From the top level menu select File → Select Records for Edit
- The file you are working on will be selected by default in the Source MARC file box. To import the Leader for review, enter LDR in the Display Field Box and Click Import.
- To isolate continuing resource records we find any records where
LDR/07=iors. In the Find box, enter the regular expression.{7}[is].{16}
- This regular expression looks for any 7 characters
(
.{7})(Leader positions 0-6), followed by the characteriORs([is]) (Leader position 7), followed by any 16 characters (.{16})(Leader positions 8-23)
- Check the Use Regular Expressions box and then click the magnifying glass. A popup window will let you know how many records were selected based on your criteria.
- Click Export Selected. You will get a popup will let you know the records have been extracted. Click OK.
Inverting your selection
When using the Select Records for Edit tool you can use the Invert Selections option to select all records that DID NOT meet your criteria. This option can be helpful when you want to select all records except for those that meet a specific criteria.
Edit selected records
Now that we’ve isolated our continuing resource records, we can add a
field for the electronic journals genre form
(655 \4$aElectronic journals) to the electronic records in
our subset.
- From the top level menu select Tools → Add/Delete Fields.
- In the Batch Editing window, enter 655 in the Field box and enter
\4$aElectronic journalsin the Field Data Box. Under General Options select Use Regular Expression, and under Add Field Options select Add Field If Present/NOT Present. - To add our 655 field to electronic records only, we need to specify
what should be present in the record for the new field to be added. What
are some fields and values we might look at to determine format? For
this example we are going to use a regular expression to look for the
presence of an 856 link or a the carrier type online resource. Enter the
regular expression
=856|=338.+online resourcein the Find What box.
- This regular expression looks for the string
=856OR the string=338followed by any character (.) one or more times (+), followed by the string online resource.
- Click Add Field. Review your data, were the new fields added correctly?
After editing your subset of records, you can either save the edits back into the original file, or save the subset of records to a new file.
To save the edits back into the original file, select File → Save (Ctrl+S). You will get a dialogue box indicating that your records have been saved back into the original file.
To save your subset of records separately, select File → Save As. Specify the name and location of your new file and click Ok.
- Regular expressions are a powerful tool for selecting and editing your data in the MarcEditor
- Regular expressions can be used in many functions and tools in MarcEdit and the MarcEditor
- Knowing your data is essential to ensuring your regular expressions are working as intended